一、Java Spring框架是什么?它有哪些好处?
Spring 是另一个主流的 Java Web 开发框架,该框架是一个轻量级的应用框架,具有很高的凝聚力和吸引力。Spring 框架因其强大的功能以及卓越的性能而受到众多开发人员的喜爱。
Spring 是分层的 Java SE/EE full-stack 轻量级开源框架,以 IoC(Inverse of Control,控制反转)和 AOP(Aspect Oriented Programming,面向切面编程)为内核,使用基本的 JavaBean 完成以前只可能由 EJB 完成的工作,取代了 EJB 臃肿和低效的开发模式。
在实际开发中,通常服务器端采用三层体系架构,分别为表现层(web)、业务逻辑层(service)、持久层(dao)。
Spring 对每一层都提供了技术支持,在表现层提供了与
Struts2
框架的整合,在业务逻辑层可以管理事务和记录日志等,在持久层可以整合
Hibernate
和 JdbcTemplate 等技术。
从设计上看,Spring 框架给予了 Java 程序员更高的自由度,对业界的常见问题也提供了良好的解决方案,因此,在开源社区受到了广泛的欢迎,并且被大部分公司作为 Java 项目开发的首选框架。
Spring 具有简单、可测试和松耦合等特点,不仅可以用于服务器端的开发,也可以应用于任何 Java 应用的开发中。Spring 框架的主要优点具体如下。
(1)方便解耦,简化开发
Spring 就是一个大工厂,可以将所有对象的创建和依赖关系的维护交给 Spring 管理。
(2)方便集成各种优秀框架
Spring 不排斥各种优秀的开源框架,其内部提供了对各种优秀框架(如 Struts2、Hibernate、MyBatis 等)的直接支持。
(3)降低 Java EE API 的使用难度
Spring 对 Java EE 开发中非常难用的一些 API(JDBC、JavaMail、远程调用等)都提供了封装,使这些 API 应用的难度大大降低。
(4)方便程序的测试
Spring 支持 JUnit4,可以通过注解方便地测试 Spring 程序。
(5)AOP 编程的支持
Spring 提供面向切面编程,可以方便地实现对程序进行权限拦截和运行监控等功能。
(6)声明式事务的支持
只需要通过配置就可以完成对事务的管理,而无须手动编程。
二、Spring IoC容器:BeanFactory和ApplicationContext
在教程前面介绍
Spring
框架时,已经提到过 Spring 的 IoC(控制反转)思想,本节来详细介绍一下 Spring 的 Ioc 容器。
IoC 是指在程序开发中,实例的创建不再由调用者管理,而是由 Spring 容器创建。Spring 容器会负责控制程序之间的关系,而不是由程序代码直接控制,因此,控制权由程序代码转移到了 Spring 容器中,控制权发生了反转,这就是 Spring 的 IoC 思想。
Spring 提供了两种 IoC 容器,分别为 BeanFactory 和 ApplicationContext,接下来将针对这两种 IoC 容器进行详细讲解。
BeanFactory
BeanFactory 是基础类型的 IoC 容器,它由 org.springframework.beans.facytory.BeanFactory 接口定义,并提供了完整的 IoC 服务支持。简单来说,BeanFactory 就是一个管理 Bean 的工厂,它主要负责初始化各种 Bean,并调用它们的生命周期方法。
BeanFactory 接口有多个实现类,最常见的是 org.springframework.beans.factory.xml.XmlBeanFactory,它是根据 XML 配置文件中的定义装配 Bean 的。
创建 BeanFactory 实例时,需要提供 Spring 所管理容器的详细配置信息,这些信息通常采用 XML 文件形式管理。其加载配置信息的代码具体如下所示:
BeanFactory beanFactory = new XmlBeanFactory(new FileSystemResource(“D://applicationContext.xml”));
ApplicationContext
ApplicationContext 是 BeanFactory 的子接口,也被称为应用上下文。该接口的全路径为 org.springframework.context.ApplicationContext,它不仅提供了 BeanFactory 的所有功能,还添加了对 i18n(国际化)、资源访问、事件传播等方面的良好支持。
ApplicationContext 接口有两个常用的实现类,具体如下。
(1)ClassPathXmlApplicationContext
该类从类路径 ClassPath 中寻找指定的 XML 配置文件,找到并装载完成 ApplicationContext 的实例化工作,具体如下所示。
1 | ApplicationContext applicationContext = new ClassPathXmlApplicationContext(String configLocation); |
在上述代码中,configLocation 参数用于指定 Spring 配置文件的名称和位置,如 applicationContext.xml。
(2)FileSystemXmlApplicationContext
该类从指定的文件系统路径中寻找指定的 XML 配置文件,找到并装载完成 ApplicationContext 的实例化工作,具体如下所示。
1 | ApplicationContext applicationContext = new FileSystemXmlApplicationContext(String configLocation); |
它与 ClassPathXmlApplicationContext 的区别是:在读取 Spring 的配置文件时,FileSystemXmlApplicationContext 不再从类路径中读取配置文件,而是通过参数指定配置文件的位置,它可以获取类路径之外的资源,如“F:/workspaces/applicationContext.xml”。
在使用 Spring 框架时,可以通过实例化其中任何一个类创建 Spring 的 ApplicationContext 容器。
通常在
Java
项目中,会采用通过 ClassPathXmlApplicationContext 类实例化 ApplicationContext 容器的方式,而在 Web 项目中,ApplicationContext 容器的实例化工作会交由 Web 服务器完成。Web 服务器实例化 ApplicationContext 容器通常使用基于 ContextLoaderListener 实现的方式,它只需要在 web.xml 中添加如下代码:
1 | <!--指定Spring配置文件的位置,有多个配置文件时,以逗号分隔--> |
需要注意的是,BeanFactory 和 ApplicationContext 都是通过 XML 配置文件加载 Bean 的。
二者的主要区别在于,如果 Bean 的某一个属性没有注入,则使用 BeanFacotry 加载后,在第一次调用 getBean() 方法时会抛出异常,而 ApplicationContext 则在初始化时自检,这样有利于检查所依赖的属性是否注入。
因此,在实际开发中,通常都选择使用 ApplicationContext,而只有在系统资源较少时,才考虑使用 BeanFactory。本教程中使用的就是 ApplicationContext
三、第一个Spring程序
通过《Spring IoC容器》的学习,读者对 Spring 的 IoC 容器已经有了一个初步的了解。下面通过具体的案例演示 IoC 容器的使用。
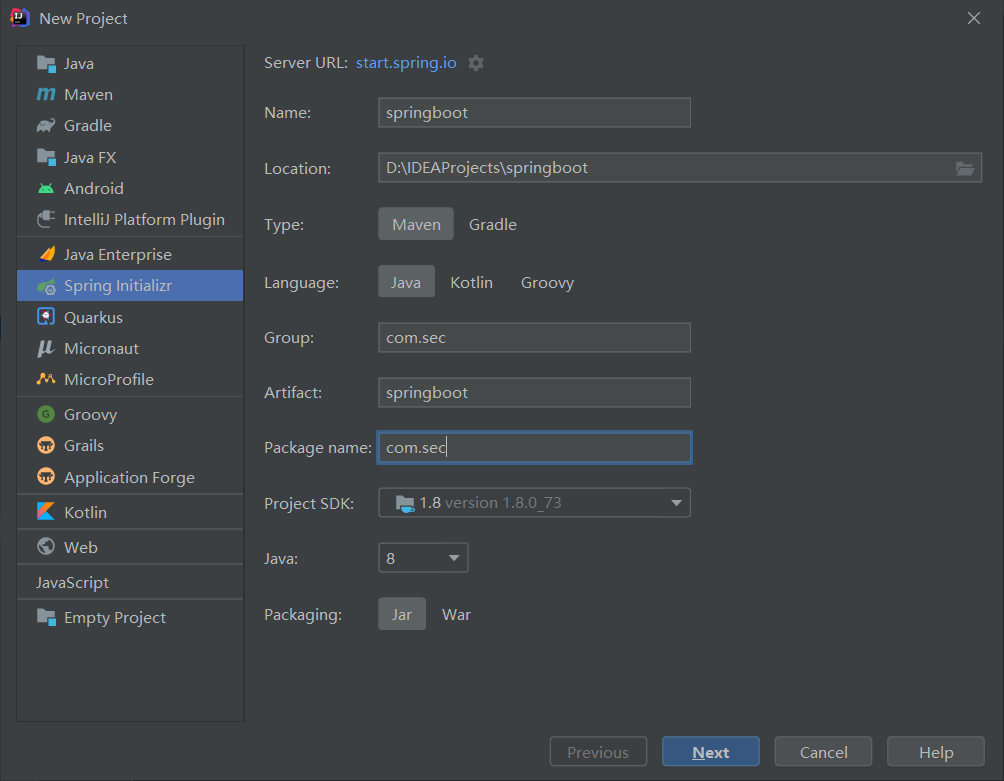
1. 创建项目
在 MyEclipse 中创建 Web 项目 springDemo01,将 Spring 框架所需的 JAR 包复制到项目的 lib 目录中,并将添加到类路径下,添加后的项目如图 1 所示。

图 1 Spring所需的JAR包
2. 创建 PersonDao 接口
在项目的 src 目录下创建一个名为 com.mengma.ioc 的包,然后在该包中创建一个名为 PersonDao 的接口,并在接口中添加一个 add() 方法,如下所示。
1 | package com.mengma.ioc;public interface PersonDao { public void add();} |
3. 创建接口实现类 PersonDaoImpl
在 com.mengma.ioc 包下创建 PersonDao 的实现类 PersonDaoImpl,编辑后如下所示。
1 | package com.mengma.ioc;public class PersonDaoImpl implements PersonDao { @Override public void add() { System.out.println("save()执行了..."); }} |
上述代码中,PersonDaoImpl 类实现了 PersonDao 接口中的 add() 方法,并且在方法调用时会执行输出语句。
4. 创建 Spring 配置文件
在 src 目录下创建 Spring 的核心配置文件 applicationContext.xml,编辑后如下所示。
1 | <beans xmlns="http://www.springframework.org/schema/beans" xmlns:xsi="http://www.w3.org/2001/XMLSchema-instance" xmlns:p="http://www.springframework.org/schema/p" xsi:schemaLocation="http://www.springframework.org/schema/beans http://www.springframework.org/schema/beans/spring-beans-3.2.xsd"> <!-- 由 Spring容器创建该类的实例对象 --> <bean id="personDao" class="com.mengma.ioc.PersonDaoImpl" /></beans> |
上述代码中,第 2~5 行代码是 Spring 的约束配置,第 7 行代码表示在 Spring 容器中创建一个 id 为 personDao 的 bean 实例,其中 id 表示文件中的唯一标识符,class 属性表示指定需要实例化 Bean 的实全限定类名(包名+类名)。
需要注意的是,Spring 的配置文件名称是可以自定义的,通常情况下,都会将配置文件命名为 applicationContext.xml(或 bean.xml)。
5. 编写测试类
在 com.mengma.ioc 包下创建测试类 FirstTest,并在该类中添加一个名为 test1() 的方法,编辑后如下所示。
1 | package com.mengma.ioc;import org.junit.Test;import org.springframework.context.ApplicationContext;import org.springframework.context.support.ClassPathXmlApplicationContext;public class FirstTest { public void testl() { // 定义Spring配置文件的路径 String xmlPath = "applicationContext.xml"; // 初始化Spring容器,加载配置文件 ApplicationContext applicationContext = new ClassPathXmlApplicationContext( xmlPath); // 通过容器获取personDao实例 PersonDao personDao = (PersonDao) applicationContext .getBean("personDao"); // 调用 personDao 的 add ()方法 personDao.add(); }} |
上述代码中,首先定义了 Spring 配置文件的路径,然后创建 Spring 容器,接下来通过 Spring 容器获取了 personDao 实例,最后调用实例的 save() 方法。
6. 运行项目并查看结果
使用 JUnit 测试运行 test1() 方法,运行成功后,控制台的输出结果如图 2 所示。
从图 2 的输出结果中可以看出,程序已经成功输出了“save()执行了…”语句。在程序执行时,对象的创建并不是通过 new 一个类完成的,而是由 Spring 容器管理实现的。这就是 Spring IoC 容器思想的工作机制。

四、Spring Bean的配置及常用属性
作为 Spring 核心机制的依赖注入,改变了传统的编程习惯,对组件的实例化不再由应用程序完成,转而交由 Spring 容器完成,在需要时注入应用程序中,从而对组件之间依赖关系进行了解耦。这一切都离不开 Spring 配置文件中使用的
定义 Bean 的示例代码如下所示:
1 |
|
在上述代码中,分别使用 id 和 name 属性定义了两个 Bean,并使用 class 元素指定了 Bean 对应的实现类。
五、Spring CGLlB动态代理(附带实例)
CGLIB(Code Generation Library)是一个高性能开源的代码生成包,它被许多 AOP 框架所使用,其底层是通过使用一个小而快的字节码处理框架 ASM(Java 字节码操控框架)转换字节码并生成新的类。因此 CGLIB 要依赖于 ASM 的包,解压 Spring 的核心包 spring-core-3.2.2.RELEASE.jar,文件目录如图 1 所示。

在图 1 中可以看出,解压的核心包中包含 cglib 和 asm,也就是说 Spring3.2.13 版本的核心包已经集成了 CGLIB 所需要的包,所以在开发中不需要另外导入 ASM 的 JAR 包了。下面通过案例演示实现 CGLIB 的代理过程。
1. 创建目标类 GoodsDao
在 com.mengma.dao 包下创建目标类 GoodsDao,在类中定义增、删、改、查方法,并在每个方法编写输出语句,如下所示。
1 | package com.mengma.dao; |
2. 创建代理类 MyBeanFactory
在 src 目录下创建一个名为 com.mengma.cglib 的包,该包下创建类 MyBeanFactory,如下所示。
1 | package com.mengma.cglib; |
上述代码中,应用了 CGLIB 的核心类 Enhancer。在第 19 行代码调用了 Enhancer 类的 setSuperclass() 方法,确定目标对象。
第 21 行代码调用 setCallback() 方法添加回调函数;第 24 行代码的 intercept() 方法相当于 JDK 动态代理方式中的 invoke() 方法,该方法会在目标方法执行的前后,对切面类中的方法进行增强;第 33~34 行代码调用 Enhancer 类的 create() 方法创建代理类,最后将代理类返回。
3. 创建测试类
在 com.mengma.cglib 包下创建测试类 CGLIBProxyTest,编辑后如下所示。
1 | package com.mengma.cglib; |
上述代码中,调用 getBean() 方法时,依然获取的是 goodsDao 的代理对象,然后调用该对象的方法。使用 JUnit 测试运行 test() 方法,运行成功后,控制台的输出结果如图 2 所示。

图 2 输出结果
从图 2 的输出结果中可以看出,在调用目标类的方法前后,也成功调用了增强的代码,由此说明,使用 CGLIB 代理的方式同样实现了手动代理。
六、Spring JDK动态代理(附带实例)
1. 创建项目
在 MyEclipse 中创建一个名称为 springDemo03 的 Web 项目,将
Spring
支持和依赖的 JAR 包复制到 Web 项目的 WEB-INF/lib 目录中,并发布到类路径下。
2. 创建接口 CustomerDao
在项目的 src 目录下创建一个名为 com.mengma.dao 的包,在该包下创建一个 CustomerDao 接口,编辑后如下所示。
1 | package com.mengma.dao; |
3. 创建实现类 CustomerDaoImpl
在 com.mengma.dao 包下创建 CustomerDao 接口的实现类 CustomerDaoImpl,并实现该接口中的所有方法,如下所示。
1 | package com.mengma.dao; |
4. 创建切面类 MyAspect
在 src 目录下,创建一个名为 com.mengma.jdk 的包,在该包下创建一个切面类 MyAspect,编辑后如下所示。
1 | package com.mengma.jdk; |
上述代码中,在切面中定义了两个增强的方法,分别为 myBefore() 方法和 myAfter() 方法,用于对目标类(CustomerDaoImpl)进行增强。
5. 创建代理类 MyBeanFactory
在 com.mengma.jdk 包下创建一个名为 MyBeanFactory 的类,在该类中使用 java.lang.reflect.Proxy 实现 JDK 动态代理,如下所示。
1 | package com.mengma.jdk; |
上述代码中,定义了一个静态的 getBean() 方法,这里模拟 Spring 框架的 IoC 思想,通过调用 getBean() 方法创建实例,第 14 行代码创建了 customerDao 实例。
第 16 行代码创建的切面类实例用于调用切面类中相应的方法;第 18~26 行就是使用代理类对创建的实例 customerDao 中的方法进行增强的代码,其中 Proxy 的 newProxyInstance() 方法的第一个参数是当前类的类加载器,第二参数是所创建实例的实现类的接口,第三个参数就是需要增强的方法。
在目标类方法执行的前后,分别执行切面类中的 myBefore() 方法和 myAfter() 方法。
6. 创建测试类 JDKProxyTest
在 com.mengma.jdk 包下创建一个名为 JDKProxyTest 的测试类,如下所示。
1 | package com.mengma.jdk; |
上述代码中,在调用 getBean() 方法时,获取的是 CustomerDao 类的代理对象,然后调用了该对象中的方法。
7. 运行项目并查看结果
使用 JUnit 测试运行 test() 方法,运行成功后,控制台的输出结果如图 1 所示。
从图 1 的输出结果中可以看出,在调用目标类的方法前后,成功调用了增强的代码,由此说明,JDK 动态代理已经实现。

七、注解开发
1.0@autowired和@resource注解的区别是什么?
1.1区别:
1、@Autowired注解由Spring提供,只按照byType注入;@resource注解由J2EE提供,默认按照byName自动注入。
2、@Autowired默认按类型进行装配,@Resource默认按照名称进行装配。
1.2解释:
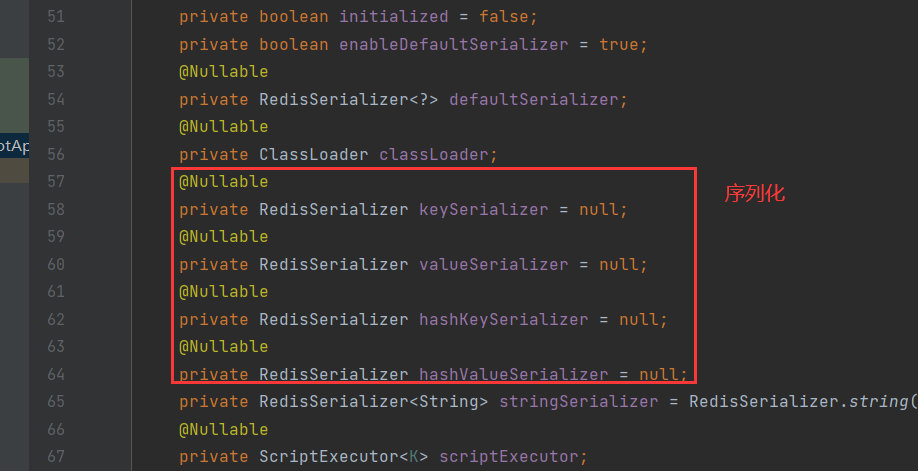
@autowired
直接在属性上使用,也可以在set方法上使用!
使用Autowired可以不用写set方法了,前提是你这个自动装配的属性在IOC(Spring)容器中存在,且符合名字ByName!
科普:
1 | //字段标记了这个注解表示这个字段可以为null; |
1 | 表示这个对象可以为空,反之不可以为空 |
@Qualifier
限定哪个bean应该被自动注入。当Spring无法判断出哪个bean应该被注入时,@Qualifier注解有助于消除歧义bean的自动注入。
八、Spring自动装配Bean
除了使用 XML 和 Annotation 的方式装配 Bean 以外,还有一种常用的装配方式——自动装配。自动装配就是指 Spring 容器可以自动装配(autowire)相互协作的 Bean 之间的关联关系,将一个 Bean 注入其他 Bean 的 Property 中。
要使用自动装配,就需要配置
| 名称 | 说明 |
|---|---|
| byName | 根据 Property 的 name 自动装配,如果一个 Bean 的 name 和另一个 Bean 中的 Property 的 name 相同,则自动装配这个 Bean 到 Property 中。 |
| byType | 根据 Property 的数据类型(Type)自动装配,如果一个 Bean 的数据类型兼容另一个 Bean 中 Property 的数据类型,则自动装配。 |
| constructor | 根据构造方法的参数的数据类型,进行 byType 模式的自动装配。 |
| autodetect | 如果发现默认的构造方法,则用 constructor 模式,否则用 byType 模式。 |
| no | 默认情况下,不使用自动装配,Bean 依赖必须通过 ref 元素定义。 |
下面通过修改《Spring基于Annotation装配Bean》中的案例演示如何实现自动装配。首先将applicationContext.xml 配置文件修改成自动装配形式,如下所示。
1 |
|
在上述配置文件中,用于配置 personService 和 personAction 的
默认情况下,配置文件中需要通过 ref 装配 Bean,但设置了 autowire=”byName”,Spring 会在配置文件中自动寻找与属性名字 personDao 相同的
使用 JUnit 再次运行测试类中的 test() 方法,控制台的显示结果如图 1 所示。

图 1 运行结果